This is the third of probably fourteen posts, each chronicling in detail the ins and outs of my Robotics class. I teach an introductory course using the LEGO Mindstorms EV3 set. My students are 7th graders who are required to take the course and may not necessarily have any background in programming/building. My school is on a trimester schedule so the course runs for thirteen weeks at a time. For this particular trimester I have one class of twenty-four students and one class of thirty-four students. I meet each class for one 50-minute period each day, five days a week. I have thirty-four computers in my classroom and one EV3 kit for every two students. I’ve been teaching this class in its current form for two years, though I’ve been teaching Robotics for eight all together.
All my best activities/projects/units I steal from someone else and then modify to (hopefully) improve. This one is not different. Damien Kee first wrote about The Wave in his book “Classroom Activities for the Busy Teacher: NXT” I read it and then watched the video below which he had posted on his blog.
I showed this video to my students at the beginning of the week and presented them with the learning target: I can collaborate with a large group of people to create a choreographed Robotic dance using only forwards, backwards, and wait for commands.
Next we had a discussion about what we actually saw in the introductory video and how to proceed. It’s amazing how much disagreement there can be about what the robots are actually doing so I let them watch it a few times on their own and then discuss with each other what’s happening. For convenience’s sake I have them break up the Wave into three distinct segments which I call The Wedge, The Split, and The Wave (which sounds confusing, but works).
Once we have established the basics, the question arises as to how the robots begin. The following conversation is typical:
Teacher: What is the first thing the robots do?
Students: Go forward.
Teacher: What makes them go forward?
Students: They move when they hear the kids yell “Go!”
Teacher: So what is the first thing they do?
Students: (slowly gaining understanding) They wait for a sound?
After coming to this realization the students want to start programming their robots right away. Instead I make them go to my green rectangle and line up their robots so they have a visual and can talk about their ideas. Students hate to talk about their ideas until they realize it will benefit them. 🙂
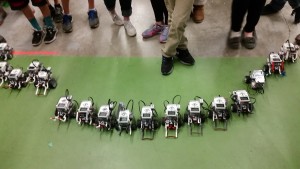
In the picture on the left below you can see my period 4 class tried to line up their robots as they imagined they would look after the first forward command. After lining up the robots they decided that the increments for their forward command would have to be really small. The picture on the right shows what happened after they executed their first try. Not too far off but not quite what they had in mind so they switched to a more classic “arrow” formation in the end.
A note here for people trying this with their LEGO Robotics classes… There are 17 robots in the pictures above. That is a very large number of robots to try this with. In the past I have found that this project was a lot easier to run by breaking my students into teams of 10 (5 robots). I offered this class that option but they all really wanted to do a big class Wave with all 17. So I let them.
Another important aspect to work out with your class is how far apart are you going to space your robots and of course how you are going to space your robots apart. I have markers and measuring tapes. I let the class do the rest. The class with 17 robots used previous marks which were 12″ apart. This spread their robots waaaaaaay too far apart. So they measured and made marks 8″ apart which kept their robots way too close and even though it looked really cool there were too many crashes, so then they tried again with marks which were 10″ apart and that worked. 🙂
After the setting up and spacing apart and deciding what you want your end point to look like, the class has to guess (hypothesize) what duration to use to make their robots move forward the desired amount. This is where the first of many really good conversations arise. Do they use rotations or seconds or degrees?
I will tell you right now that using rotations (or degrees) makes this project more difficult (though not impossible [1]). The “Wait For” block in EV3 allows your robot to wait for a number of different conditions including rotations. But you’re not waiting for the rotations of your own robot, you’re waiting for other robots. You can’t use the “Wait For” block to read another robot’s motor rotations, but you can wait for the time it takes for other robots to move since time is a constant independent of other robots. So if the move blocks are programmed with time it is easier for students to figure out how long some robots need to wait to sync with the movement of others. (Some students will try to time a rotation using their smartphones or watches but that is rarely accurate. If you have time you can let them try this.) Whether you tell your students to use time, lead them toward it, or just let them figure it out on their own is up to you. For me it depends on class size and what sort of feel I get for how much help a class may need.
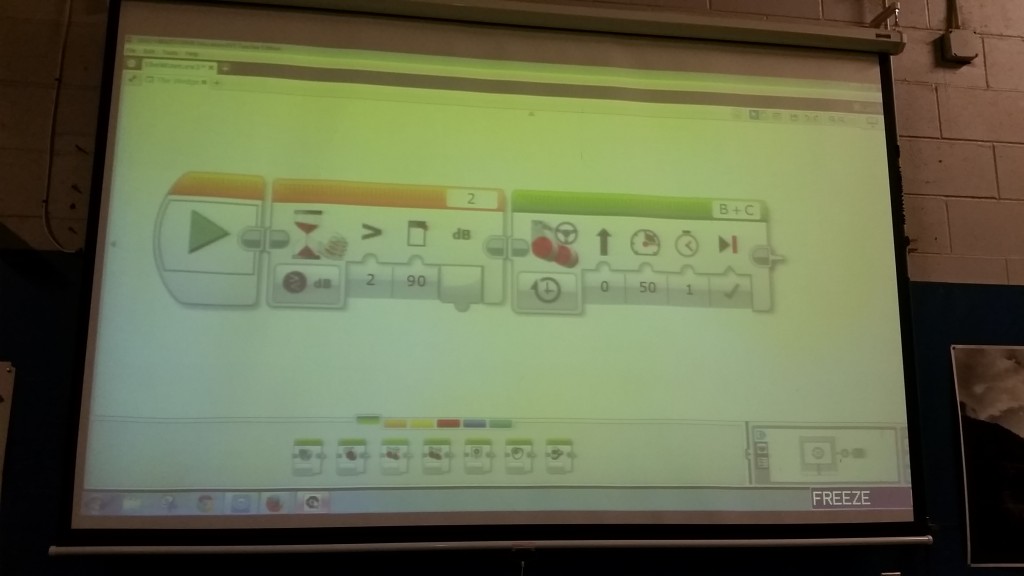
When all of these decisions have been made, it’s time to program. One of the things I absolutely love about EV3, is the ability to magnify the screen. Here’s what I show my class to help them get their program started:
I always forget to show them the comment tool before it’s too late. I highly suggest you have them start annotating programs from the beginning. In the example above the students all have a different amount for the duration in the move block (green) on the right otherwise their programs are identical at this point. Some student will always copy the “1” instead of putting their own value in there. That’s called learning. The great thing about this project is it’s easy to see when someone has made a mistake:
What’s equally as important as identifying which robot has made a mistake, is figuring out what the mistake is. Therefore I have a rule in my class: Nobody is allowed to touch the robots, especially when they don’t perform correctly, until we have all had a chance to try and troubleshoot the problem.
About 80% of the time the problem students run into is they run the program from the “Recent” file tab instead of the “Project” tab.
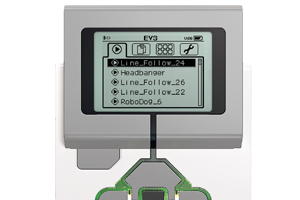 If you’re not familiar with this I consider it one of the weaker spots on an otherwise brilliant product. The tab on the left runs the most recently run version of a program. So if you change a value and download the new program, then click the program name from the tab shown above, you will actually run the previous version of the program. This can cause mega problems. The difficulty with the next tab over is every program is saved within a project and no matter how many times you tell 13 year-old students to give their projects and programs distinct names, they don’t do it right away. So every project is named “Project1, Project 2, etc.” and programs are named the same. Arrrrgh!
So now they’ve programmed their robots to go forward and they’ve fiddled with values until the class likes how it looks; something like this:
Next they need to come back. And there’s some great math to work out here; first let’s watch the next two videos:
Clearly there’s a problem. So this is where I turn to my whiteboards. For $20 and a little bit of effort you can turn any surface into a whiteboard using whiteboard paint manufactured by Rustoleum (and perhaps others). I buy mine at Home Depot.
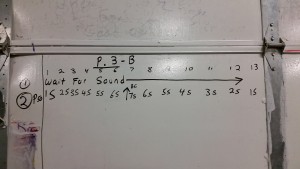
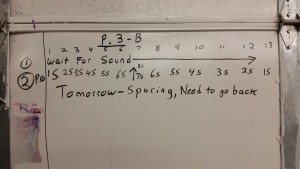
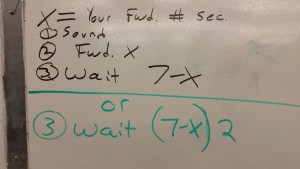
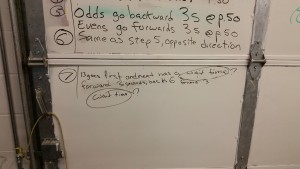
In the images above you have quite a lot going on, but I’ve found this is the best way for students to work out their programs in their heads before going back to their computers. I even tell them to take pictures with their smartphones as we work this out.
In image #1 you see the beginning of our program: the top line is the robot # (if you recall I number all my robots with sharpie markers), the next line says “Wait for Sound” and the line after that shows what duration of seconds they will go forward for.
Image #2 is the same but with our notes for the next day.
Image #3 is where the fun really begins for me. This was the fourth period class and we had 17 robots. The middle robot went forward for 7 seconds. At this point some of the students are starting to see the algebra emerge, for others you have to make it explicit. For each robot to go back at the same time, you have to wait until the the furthest robot (the one in the middle) has reached its apex. In this case the one in the middle is going 7 seconds, so a robot that is going forward for 3 seconds will have to wait (7-X) where X = the number of seconds they went forward. In other words they will wait (7-3) or 4 seconds before they go back to the starting line. It looks like this:
There is an alternative. Each robot can wait for the robots to come back in line with them before they start moving back. In the example I wrote above if the robot is going forward for 3 seconds it has to wait another 4 before the middle robot reaches its apex; but if it wants to wait for that robot to come back in line so they’re even, it has to wait twice that long, or (4X2) = 8 seconds. And in the whiteboard pictures above you can see this expressed algebraically: (7-X)2. It looks like this:
I let the students write all the notations on the board themselves and they figure out the algebra themselves. One of the most powerful changes I’ve made in my teaching over the last few years is I no longer call on people to answer questions. I pose the question, tell them to discuss the answer with their partners, then I pick on students randomly. This has greatly upped the participation and understanding of my students. The class knows that I might call on any of them – not just ones raising their hands – so they all discuss answers and are ready with a response when I call on them.
In the last image of the four above you can see the Split has been worked out and the Wave is almost there. That was my period 3 (smaller class); my period 4 class only finished the Wedge in this first week. So I’ll stop here and let you digest all this. Next week I’ll pick up with the last two parts as well as the culminating activity.
As I stated at the top, this is the third of 14 weekly class posts. I’d appreciate any questions, comments, ideas, strategies, etc. that you may have to help me and all the other Robotics teachers out there improve our pedagogy. Thanks!
Footnotes
1. ^ Okay, so there are some ways to do it. You can use the timer icon to time how long the robots are going forward for or you could use bluetooth to send messages when the robots are at the apex of the Wedge. But as this is usually one of the first activities I do, I like to keep it simple.
Also in A Week in the Life
Ian Chow-Miller covers the highs and lows of his introductory robotics class for 7th graders.
- A Week in the Life #1: Play Well!
- A Week in the Life #2: Starting to Wave
- A Week in the Life #3: Wave Goodbye
Latest posts by Ian Chow-Miller (see all)
- Using Video to Assess Robotics Students - 21 November 2018
- A Week in the Life #12: Robot Monsters! - 9 February 2017
- A Week in the Life #11: Sumobot to Battlebot - 28 June 2016
- A Week in the Life #10: Candy Sorter - 27 June 2016
- A Week in the Life #9: Walk This Way… - 23 November 2015

