This is the eighth of probably fourteen in a series of posts, each chronicling in detail the ins and outs of my Robotics class. I teach an introductory course using the LEGO Mindstorms EV3 set. My students are 7th graders who are required to take the course and may not necessarily have any background in programming/building. My school is on a trimester schedule so the course runs for thirteen weeks at a time. For this particular trimester I have one class of twenty-four students and one class of thirty-four students. I meet each class for one 50-minute period each day, five days a week. I have thirty-four computers in my classroom and one EV3 kit for every two students. I’ve been teaching this class in its current form for two years, though I’ve been teaching Robotics for eight all together.
If you have been following my “A Week in the Life” series, you may have noticed that my class in the trimester I’ve been chronicling has leaned more heavily towards mechanical engineering than programming. Upon reflection (good teachers reflect, right?) I’m not sure why that is. It could be because the activities I’ve found the most challenging and fun lean that way, it could be because my personal strengths are more in building than programming or a few other reasons. I know when my introductory class was a twenty week semester instead of a thirteen week trimester as it is now I had more time for programming and I’m pretty sure the difficulties I chronicled in #4 also had something to do with it.
So that leads us to a quick and simple unit wherein I taught thresholds and some basic programming techniques with a little twist that stumped some of my students. The following picture of my whiteboard wall says a lot about what we did this week:
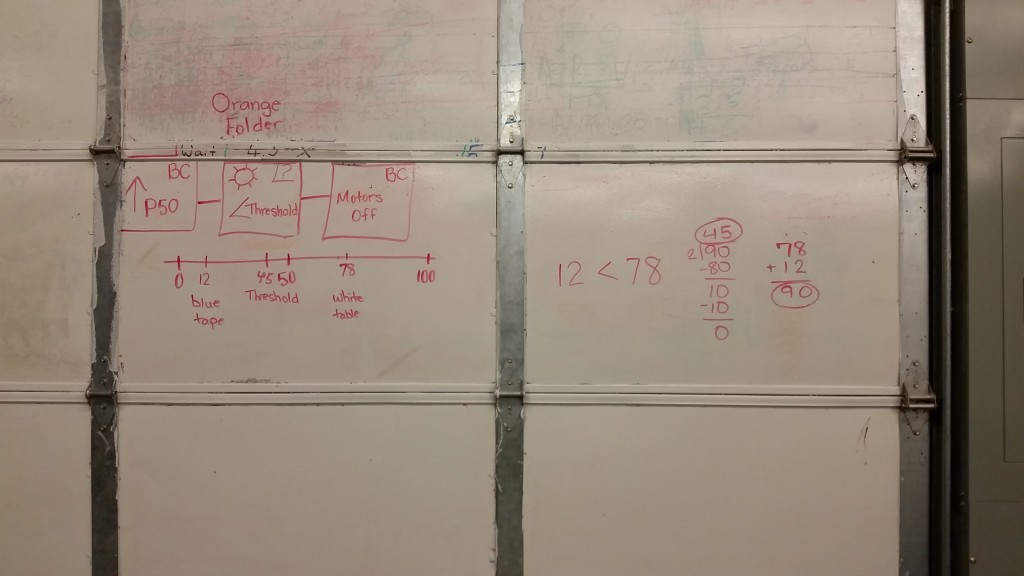
I began by having my students write a number line on the whiteboard tables (there’s always one group that interprets “a number line from 1-10” as meaning to write every single whole number in between!). On the tables, I have blue tape strips (and if I haven’t already said it, colored electrical tape is a Robotics teachers’ best friend). The students will use the color/light sensor in reflected light mode to get a reading for the white table and the blue tape and to write those down on the number line.
The first challenge we are working towards is having robots drive forward and stop on a colored line different than the surface color. The two videos below show an unsuccessful and a successful run some teachers did during a training session from a few years ago. For whatever reason, I didn’t take as many pictures and videos in class this week so I’m digging through the archives to find ones that line up.
Any guesses as to why the robot didn’t stop in that last one? And did you notice that it did stop at the end of the table?
My guess is they told the sensor to look for a number less than their threshold, indicating less light being reflected – like from the darkness below the table. The yellow tape looks to be more reflective than the tan table (I’m guessing here – it was a few years ago) so they probably need to change to greater than their threshold.
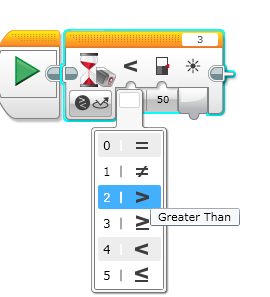
Anyone who remembers the NXT programming environment knows that twelve year old students are not good with the less than, greater than symbols.
Luckily EV3 helps them out:
The description of the symbol only pops up when you hover over the symbol with the cursor and they also include those meaningless numbers on the left which are supposed to be helpful somehow but I usually find just cause confusion.
A few notes on the color/light sensor modes: I have a large room with overhead fluorescent lights. I tell my students to look up at the lights and close their eyes, then to slowly wave their hands in front of their eyes. This mixture of darkness and light they are seeing through their eyelids is akin to ambient light mode. I call it the “amount of given light in a room.” If this is not totally accurate I think it’s close enough. For the color light mode I tell them that the sensor can actually read colors and works best with LEGO colors. And finally in reflected light mode I tell them to look at the sensor and tell me how many bulbs they see. Two. One “shoots” out a beam of light and the other reads how much light is reflected back. We then discuss what type of surfaces might reflect back more light than others. After discussing this for a while, we refer back to the readings they got on the table and tape and then expand to talk about how darker colors absorb more light and that’s why Mom always says to wear light colors in the summer.
And then it’s time to talk about thresholds. We discuss possible meanings and how it can be used as a “trigger point” for robot action. Why use a threshold instead of the exact number, they may ask? I have them push their robot around the table and ask them if they get different readings just on the white table. Luckily my tables get dirty, students cast shadows, paint gets chipped off and other things happen which give darker readings than the pure white spots. Once they understand this it’s time to get programming.
I have a mantra when using sensors, which goes, “Do something, sense something, do something else.” Those of you familiar with the Stop on a Line activity will have come across the situation where a robot doesn’t stop because the students just told it to go forward and sense a line, but not to actually stop when it does. I have another saying which cracks my students up, “Robots are really stupid, but really fast.” This tongue and cheek phrase is used to explain how the robot doesn’t know what you want it to do unless you tell it exactly what to do.
Okay, so back to the beginning. The symbols I wrote on my whiteboard wall are shorthand for the program the students will have to start writing. They copy it down on the whiteboard tables and then take pictures with their phones so they don’t forget when they return to their computers.
Most of my students can program their robot to accurately stop on a line pretty quickly. I give some extra attention to those who don’t while providing a new challenge to those who do. I have a series of three same-colored pieces of tape in on the tables and I tell the students to program their robot to drive forward and stop on each piece, remaining at the third piece. This extra little step gets them thinking!
Here’s an example of a group that could get their robot all the way to the end but had problems stopping at each line along the way:
And here is how I dealt with their understanding, watch the light bulb turn on when they start to get it.
This next group did a great job explaining the same thing that happened to their robot; they were able to reason it out without the demonstration I did above. You can really hear brains at work in these videos.
Here are two teams successfully completing this challenge and their explanations of the process they went through. Again you can hear their brains whirring.
To round out this week I challenged the teams to try and do the following:
Program your robot to drive to the edge of the table and stop, then back up, turn 90 degrees, and repeat.
This challenged them to use their light sensors for something they may actually want to use their ultrasonic sensor for at first – “seeing” the edge of the table. It also introduced the use of they gyro sensor and reinforced the use of loops.
See some of the attempts below:
In this next one I use the poorest English grammar I can imagine:
If you’re familiar with the gyro sensor, you know that it is a finicky little friend:
As you can see in the last video, the gyro sensor showed up as a sound sensor in the port that the gyro sensor is plugged into. And in the previous video you can see that unplugging the gyro didn’t work either.
So this is as far as I got in one week playing with the sensors. Certainly not the best work that I’ve done as a teacher in terms of there being no overarching big challenge or fun open-ended project. There are a few reasons for that. Usually after this introduction I have them create a robotic animal that responds to its environment the way a real animal does, using one of the sensors. This idea was borrowed from one of the first challenges in Dr. E’s Challenges. They are all very cool and I suggest you check them out.
This trimester I had a different idea for the next unit, so I kinda dropped the use of sensors towards the end of the trimester, and as I’ve chronicled before, things got away from me a bit time wise. 🙂
I’d be glad to hear your thoughts, ideas, comments and questions on these activities. Thanks!
Also in A Week in the Life
Ian Chow-Miller covers the highs and lows of his introductory robotics class for 7th graders.
- A Week in the Life #6: Faster and Steeper
- A Week in the Life #7: Sensor Fun
- A Week in the Life #8: Moving With Linkages
Latest posts by Ian Chow-Miller (see all)
- Using Video to Assess Robotics Students - 21 November 2018
- A Week in the Life #12: Robot Monsters! - 9 February 2017
- A Week in the Life #11: Sumobot to Battlebot - 28 June 2016
- A Week in the Life #10: Candy Sorter - 27 June 2016
- A Week in the Life #9: Walk This Way… - 23 November 2015

