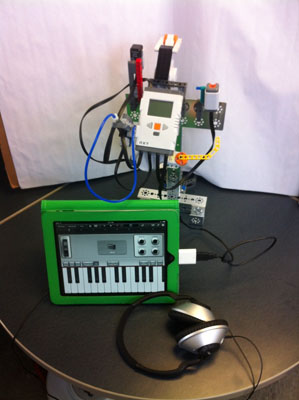
 In this article, we talk about how you can make your own digital musical instrument with the LEGO NXT and connect it to an iPad using MIDI.
The idea
You can design and build your own musical instrument with the NXT where the sensors act as the note control inputs – just like the keys on a piano or the strings on a guitar. By “playing” the sensors on your instrument, you can cause the NXT to interpret the input values as specific musical notes. These digital notes are sent out of the NXT in a special language, the MIDI protocol, designed specifically for electronic musical instruments. Speaking the standard digital music protocol means all you have to do is plug your NXT into a MIDI compatible synthesizer, such as the iPad, and voila! Instant digital music!
The system
In traditional (acoustic) instruments, the musician uses the keys, strings, and other input devices to directly change how the instrument produces sound and, thus, plays different notes. In an electronic instrument, the musician still uses the input controls to dictate what notes to play, but this can be completely separate from the module that actually turns those digital notes into sound waves. In this way, the system has two parts: 1) the control instrument that the musician physically “plays”; and 2) the synthesizer that takes the instructions from the control instrument of what notes to produce and makes the audible noise (or hopefully, music!).
Today, we are focusing on just the control instrument – which is your LEGO NXT creation. The synthesizer can be any device with a speaker that understands MIDI. We used the Garage Band app for the iPad, but most computers can act as synthesizers with freely-available or built-in software.
The components
For our LEGO NXT Musical Instruments, there are four main components, as seen in the System Diagram below.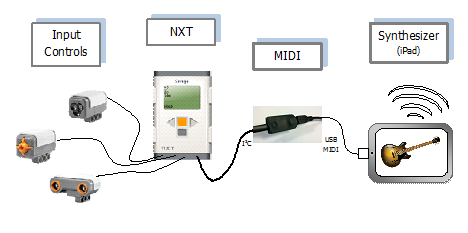
System Diagram
- Input Controls – The sensors that act as the input devices for your instrument. Try Touch Sensors for “keys” or maybe a Sonar sensor for a “string”.
- NXT – The NXT is responsible for reading the sensors and deciding what musical notes should be played. A simple set of MIDI VIs make it easy to program this logic in LabVIEW for LEGO MINDSTORMS.
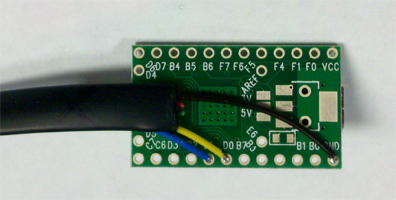
- MIDI Cable – This MIDI adapter cable allows us to connect an NXT sensor port to a USB port, and appear as a standard USB-MIDI Device. It is made out of a split NXT wire and a Teensy 2.0 microcontroller board, programmed in the Arduino IDE. The firmware code will work for any NXT-MIDI instrument and is available in the Downloads section of this article.
- Synthesizer – The iPad is used as a MIDI synthesizer. Using the iPad USB Camera Connector Kit, we can plug our instrument’s MIDI Cable (3) directly into the iPad and the Garage Band app will automatically recognize it as a Musical Input Device.
The code
The program on the NXT is where you decide what notes your instrument can play and how you will interact with your NXT instrument. In the MIDI protocol, musical notes are enumerated from 0-127, which represent increasing frequencies of the notes. However, this is a very large range and not always appropriate for most synthesized instruments and sound sets. ‘Middle C’ on a normal piano is MIDI note number 60. Each piano key above and below Middle C is increments or decrements the MIDI note number respectively. Thus, if we want our instrument to play piano sounds, MIDI notes 40-88 would be a good range to use.
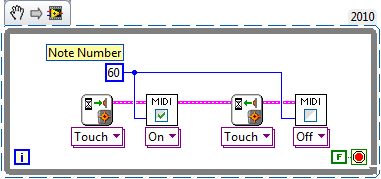
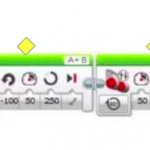
In the MIDI protocol, notes are communicated with two events: Note On, and Note Off. It is easy to think about this in terms of a piano key. When you press the key down, a Note On message is sent with that MIDI note number. When you lift your finger and release the key, a Note Off message is sent with that same key number. (This is important! Otherwise the note will never stop playing!) Below you can see the LabVIEW code to turn a single note On and then Off when a touch sensor is pressed.
The MIDI VIs
In the Downloads section you can find the MIDI VIs palette set. Just drop this in your user.lib folder and you will be able to use them right along side the NXT Toolkit VIs. The only VI you will need to use directly is the MIDI Poly VI. From this VI, you will be able to access the two main Note On and Note Off subVIs, and a variety of other MIDI commands that will let you further alter the sound and effects of your instrument.
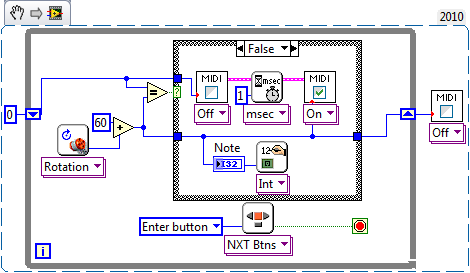
Also included in the MIDI VIs folder are two demo programs called TestDemo_basic.vi and TestDemo_advanced. These will show you a slightly more complex programming style in addition to demonstrating using different note values with one sensor.
The MIDI cable
The MIDI Cable is a homemade adapter for communicating between the NXT and a USB port. The information in messages going in and going out is the same, just different packaging. The NXT uses a communication protocol called i2c. The Teensy board reads the i2c message from the NXT and sends it on via the USB protocol to the computer.
The Teensy board also has the ability to pretend to be a standard USB device. This means, just like you have computer keyboards that create digital letters, and mice that create digital pointers, our NXT Musical Instrument can automatically appear to computers as a digital MIDI instrument to create digital MIDI music.
As mentioned before, a USB-mini cord connects from the Teensy to a computer, iPad, or any other speaker system that can understand the MIDI standard music protocol. When connecting to the iPad, an Apple iPad Camera Connection Kit is also necessary (for the USB port it provides).
Building instructions
- Cut a normal NXT sensor wire in half, and then strip off the black outer coating so you can see the multi-colored wires.
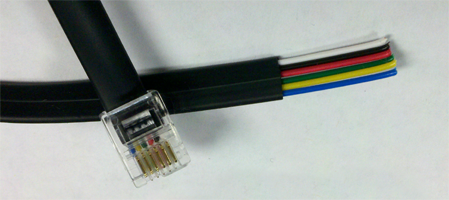
- Carefully strip the colored coating at the end of the following three wires in the below picture so that you can see the bare copper (you can clip off the remaining wires). Then solder the wires to the connectors on the Teensy 2.0 as shown.
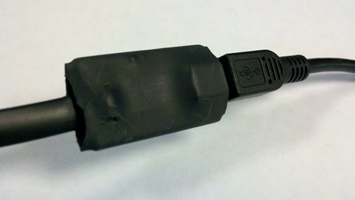
- Add a little super glue for hold, and some heat shrink for protection, and you now have a nice looking adapter cable.
Cable programming onstructions
- Download and install the Arduino IDE, and then the Teensy loader add-on, from their respective sites.
- Download the sketch from this page (NXT_MIDI2_2c.ino)
- Open the sketch in Arduino, plug in your Teensy and select ‘Teensy 2.0’ from the Boards menu.
- Hit the “Reset” button on your Teensy (it may be under the heat shrink).
- Once your computer recognizes the Teensy device again, select the proper USB port from the Boards menu, and hit Upload.
Downloads
- All_NXT_MIDI_files
- MIDI_VIs palette
- NXT_MIDI2_2c.ino (Teensy Arduino sketch)
For more information
- MIDI: http://www.midi.org/aboutmidi/intromidi.pdf
- Teensy: http://www.pjrc.com/teensy/
- Arduino: http://arduino.cc/
- Garage Band: http://www.apple.com/ilife/garageband/
- LabVIEW for LEGO MINDSTORMS: .//program/labview/
CEEO
Latest posts by CEEO (see all)
- Chair for Mr Bear - 21 August 2020
- Assistive Technology: Making Lives Easier - 20 August 2020
- Sturdy Tower - 14 June 2020
- Going the Distance - 21 May 2020
- GPS accuracy testing with LEGO bricks - 10 September 2015
