Here is a selection code examples and some simple challenges for the various modes of ROBOLAB, i.e. Pilot, Inventor, and Investigator.
In each case, the idea is to copy the sample code and then see if you can work out how to modify it as suggested.
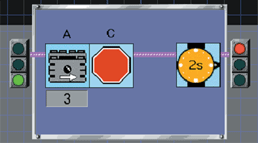
Pilot 1
Requirements: A robot car with two motors. Attach both motors to Port A.
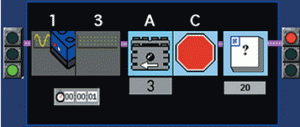
- Write a program exactly like the one above.
- Change the amount of time that your car travels.
- Change the direction in which Motor A moves.
Pilot 2
Requirements: A robot car with two motors. Attach both motors to Port A.
- Write a program exactly like the one above.
- Program Motor A to its highest power and make your car drive for 4.5 seconds.
- Change one motor to Port C and program the car to drive forward for 4 seconds.
Extra challenge
- Program your car to make an S-shape when it drives. You’ll need to pay attention to direction, speed, and time.
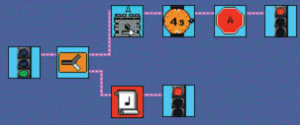
Pilot 4
Requirements: You will need a robot car with two motors.
- Write a program exactly like the one above.
- Make Motor A run until the touch sensor is pressed instead of waiting for time.
- Program the RCX to play a sound after the motor stops.
Extra challenges
- Put one of your motors on Port C and leave the other on Port A. Make both motors start at the same time and then stop at the same time. You can only use one stop sign.
- Attach a touch sensor to Port 2. Make your motors stop when you press the touch sensor.
Inventor
Light Sensor
Requirements: You will need a robot car with two motors, a light sensor, black electrical tape, and a black piece of construction paper. Attach both motors to Port A. Attach the light sensor to Port 1. Use electrical tape or other dark tape to make a line on the floor.
- Write a program exactly like the one above.
- Place another line of tape on the floor at least 30 cm (12 in) from the first line.
- Program your car to drive to the first line, reverse, and then stop when it hits the second line. Make sure you start your car in the middle of the two lines.
- Place a piece of dark construction paper on the floor. It should be darker than the floor.
- Program your car to drive and play a beep when it hits a surface lighter than the paper. You will need to take a light reading and add it as a modifier.
- Position your programmed car in the middle of the paper and run the program.
Extra challenge
- Program your car to drive when the lights in the room are turned off and stop when the lights are turned back on. Your car should be able to do this repeatedly.
Touch Sensor
Requirements: You will need a robot car with two motors. Attach one motor to Port A and one motor to Port C.
- Write a program exactly like the one above.
- Make your motors stop when you press the touch sensor.
- Write a program that will wait for the touch sensor to be released. Use the ‘Wait for Let Go’ icon.
Extra challenge
- Use the touch sensor to control the direction of the motors. Use loops so that you can make your motors switch directions every time your press the touch sensor.
Jump
Requirements: You will need a robot car with two motors. Attach both motors to Port A.
- Write a program exactly like the one above.
- What do the Jump icons tell the car to do?
- Write a program that uses music and the Jump icons.
Extra challenge
- Write a program that uses the touch sensor and the Jump icons.
Loop
Requirements: You will need a robot car with two motors. Attach both motors to Port A.
- Write a program exactly like the one above.
- Program an action before the loop.
- Write a program using the ‘Loop While Touch Sensor is In’ icon.
Extra challenge
- Make your car drive forward until the touch sensor has been pressed in four times. You will need to use the ‘Loop While Number of Touches and Releases is Less Than’ icon.
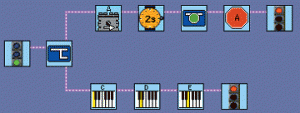
Forks
Requirements: You will need a robot car with two motors and a touch sensor. Attach motors to Ports A and C. Attach the touch sensor to Port 1.
- Write a program exactly like the one above.
- Add a jump or a loop to the program so that it repeats. Hint: Put them where the program will let you keep using the touch sensor to control the motor. Add a beep so you will know that the cycle begins again. Use Jumps and Lands or Loops.
- Write a program using the ‘Timer Fork’ icon. You will need to use the ‘Zero Timer’ icon. Place the Zero Timer icon after the green light.
Extra challenge
- Pretend your motor is a generator. Program your generator to turn on when the light in the room goes off and turn off when the light comes back on.
Split Task
Requirements: You will need a robot car with two motors. Attach both motors to Port A.
- Write a program exactly like the one above.
- Program your car to drive backward before the Task Split icon.
- Move one of your motors to Port C.
- Program the motors to do two different things at the same time.
Extra challenge
- Think about something you could build besides a car that would do two things at the same time and that would need a split task.
- What would you build and what two things would it do?
Subroutine
Requirements: You will need a robot car with two motors. Attach both motors to Port A.
- Write a program exactly like the one above. The Create Subroutine icon is used to create the subroutine. The subroutine will not run until the Run Subroutine icon appears.
- Program the robot to run this subroutine two times. You need to place the Run Subroutine icon at two different places in the program. You can add to or change the program.
- Make a subroutine that does not use music.
Extra challenge
- You will need an RCX car with two motors, a light sensor, and a touch sensor. Write a program with two subroutines. Program your car to do one subroutine based on light sensor input and another subroutine based on the touch sensor input. You will need to use a different modifier for each Run Subroutine command.
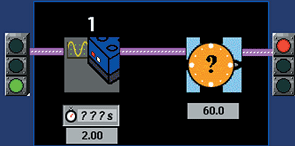
Investigator 1
Requirements: You will need a robot with a light sensor. Attach the light sensor to Port 1.
- Write a program exactly like the one above. What do you think the program is telling the brick to do?
- Download the program to the brick.
- Run the program and collect data by walking around the room. Point the light sensor at areas with different light levels as you take data.
- Go to the Upload Area and send the collected data from the RCX to the computer. Once you have sent the data to the computer, you can view it. These data points should be in red.
- Run the program again and collect more data.
- Go to the Upload Area and press the ‘+’ button to add another set of data.
- Upload the data and then click on the bucket and make this set of data a color different from red.
- Go to the View and Compare Area located in the Tool Box to see a plot of the two sets of data.
Extra challenge
- Go to the Journal Area and write about your results and what you could change in the next program.
Investigator 2
Requirements: You will need a robot with two motors, a light sensor, and black electrical tape. Attach both motors to Port A. Attach the light sensor to Port 1. Use black electrical tape or other dark tape to make a line on the floor. The line should be darker than the floor.
- Write a program exactly like the one above.
- Download the program to the brick.
- Run the program and collect data while your car drives on the floor and over the tape.
- Go to the Upload Area and upload your data. Name this set of data ‘tape’.
- Run the same program on the floor without the tape.
- Go to the Upload Area and upload the data into a second data set. Name this set of data ‘floor’. Click on the bucket and make this set of data a color different from red.
- Go to the View and Compare Area located in the Tool Box to see a plot of the two sets of data. Each set of data should be a different color.
Extra challenge
- Write a program that uses two sensors, such as the light and temperature sensors. Take data, upload it, and then view it.
Investigator 3
Requirements: You will need an RCX with two motors, a light sensor, and a touch sensor.
- Write a program with the following steps that occur in the order listed below:
- Program the car to drive while obtaining light data. Capture at least ten data points.
- Program the car to turn for a set amount of time without collecting data.
- Program the car to drive and capture data until the touch sensor is pressed. You can connect the touch sensor directly to the car or hold it in your hand.
- Upload the data in to the red bin.
- Go to the Compute Area. Adjust the date as shown in the following example and make this data the purple bin.
Extra Challenge
- Upload a second set of data. Save it to the blue bin. Then go to Compute Tools 2 in the Compute Area and compare the blue bin and the red bin.
Investigator 4 (example 1)
Requirements: You will need an RCX car, a light sensor, and a touch sensor. Attach the light sensor to Port 1. Attach the touch sensor to Port 2.
- Write a program exactly like the one above.
- Walk around the room as you collect data.
- View your data after you upload it.
- Write a program that drives the car while collecting light data. You should collect at least ten data points.
- View your data after you upload it. Make this the red data set.
- Run the same program used in Step 2 in another area of the room.
- Make this the blue data set when you upload it.
- Compare the red and blue data sets in the View and Compare area.
- Program the car to take 5 seconds of data and then stop data collection.
- Program the car to drive for 5 seconds and then stop.
- Program the car to take another 5 seconds of data. Use the Resume Logging Icon. Data collection should stop at this point.
Extra challenge
- Write a program that uses the touch and light sensors to collect data as your car drives.
Investigator 4 (example 2)
Requirements: You will need an RCX car, two touch sensors, and black electrical tape. Attach the light sensor to Port 1. Use black electrical tape or other dark tape to make lines on the floor. The lines should be darker than the floor.
- Write a program exactly like the one above.
- Walk around the room as you collect data.
- View your data after you upload it.
- Rewrite the program so that your car drives while collecting data.
- Make two parallel lines on the floor with the tape. Measure how far apart they are. Try to figure out how fast your car is driving based on light data collected by the car as it drives.
- Move one of the strips of tape. Try to figure out how far apart the strips of tape are based on light data collected from the car, using the speed of the car that you determined in the previous step.
- Write a program that takes data, stops data collection when the touch sensor is pressed in, and then resumes data collection when the touch sensor is released. Use the Resume Logging icon.
Extra challenge
- Make a bumper car by attaching a touch sensor to each end of the car. Each time the car drives forward and hits a wall or other surface, the touch sensor should become depressed and the car should reverse direction.
- Your program should also collect light data for two minutes and then play a sound to signify the end of data collection.
CEEO
Latest posts by CEEO (see all)
- Chair for Mr Bear - 21 August 2020
- Assistive Technology: Making Lives Easier - 20 August 2020
- Sturdy Tower - 14 June 2020
- Going the Distance - 21 May 2020
- GPS accuracy testing with LEGO bricks - 10 September 2015





One thought on “ROBOLAB quick guide”
Comments are closed.